Plausible & Umami APIs: Pulling Privacy-First Data Programmatically
Most privacy-first analytics setups stop at the dashboard. You log in, check your numbers, and move on. But if you want to automate reporting, build custom dashboards, or feed analytics data into a pipeline — you need to talk to the API. Both Plausible and Umami expose clean REST APIs that make this straightforward, and the Umami API in particular rewards a closer look: it handles Cloud and self-hosted deployments through two distinct auth patterns that are easy to mix up.
In this guide I’ll walk you through authenticating with each tool, making your first requests, and comparing the two on the dimensions that matter for real integrations. Real curl commands you can run today, and a small pipeline example at the end.
If you’re newer to the underlying concepts, what a web analytics API is and how it works is a good starting point. And if you’re still evaluating tools, the best web analytics APIs compared puts Plausible and Umami alongside the wider field. This article focuses on the implementation detail once you’ve chosen one — or both.
What Makes a Privacy-First Analytics API Different
Before jumping into code, it’s worth naming what you’re getting by choosing a privacy-first analytics API over a proprietary one.
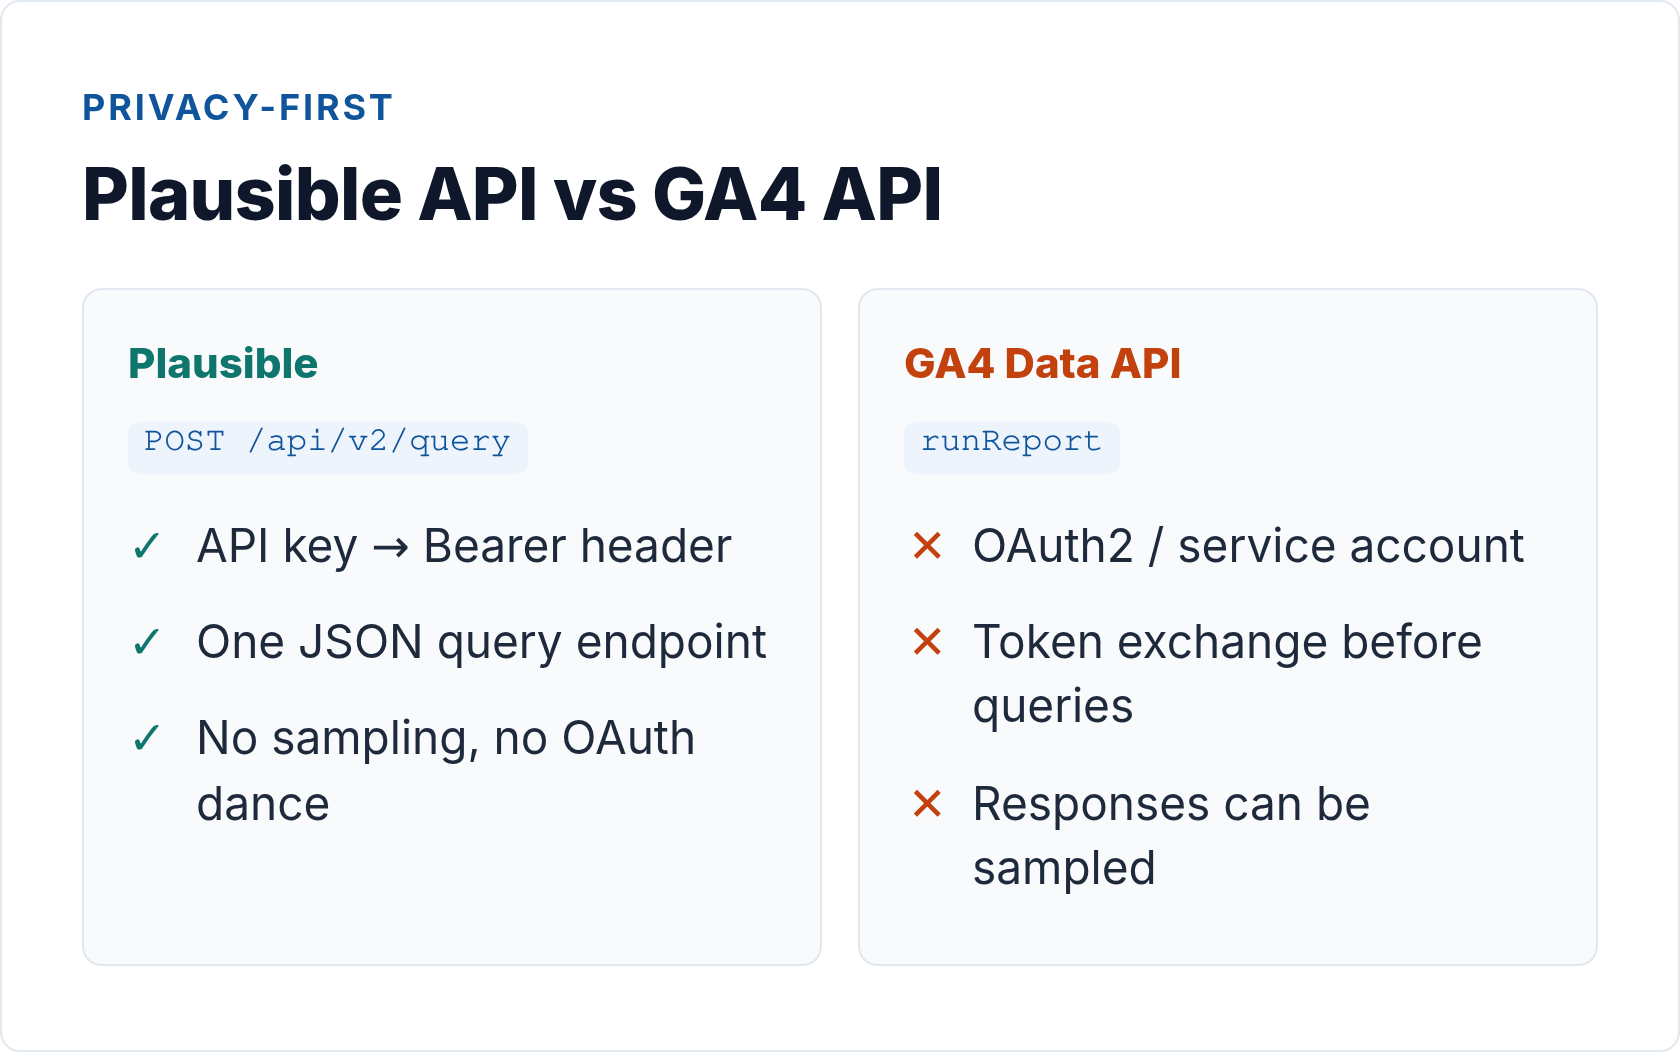
With GA4’s Data API, you’re querying sampled, cookie-based data behind OAuth2 flows that require service accounts and a Google Cloud project. Consent gaps mean missing data. Sampling kicks in on larger date ranges. And your data lives on Google’s infrastructure — full stop.
Plausible and Umami take a different position. Neither sets cookies. Neither fingerprints visitors. Both are open-source, which means you can audit exactly what data is collected — and, if you need it, self-host so the data never leaves your own servers. The APIs reflect this: simpler auth, straightforward JSON responses, and no sampling caveats to navigate.
That simplicity translates into faster integrations. In my experience helping teams migrate away from GA, the Plausible and Umami APIs are the part that surprises people most — you’re up and running in minutes, not hours.
Plausible Stats API: Authentication and Your First Query
Plausible uses a straightforward Bearer token for authentication. You generate the key from your account settings at plausible.io, then pass it in the Authorization header on every request. That’s it — no OAuth dance, no refresh tokens.
For deeper background on the different auth patterns analytics APIs use — API keys, OAuth, and service tokens — the analytics API authentication guide covers the trade-offs.
Getting Your Plausible API Key
Go to plausible.io/settings, navigate to the API Keys section, and create a new key. Treat this like a password: store it in an environment variable, never in client-side code or version control.
Making a Query
The current endpoint is POST /api/v2/query (the older v1 GET endpoints are legacy — use v2 for any new work). You POST a JSON body describing what you want: which site, which metrics, what date range, and optionally filters or dimensions to break the data down.
Here’s a minimal example — total pageviews and unique visitors for the last 30 days:
curl -X POST https://plausible.io/api/v2/query \
  -H "Authorization: Bearer YOUR_API_KEY" \
  -H "Content-Type: application/json" \
  -d '{
    "site_id": "yourdomain.com",
    "metrics": ["pageviews", "visitors"],
    "date_range": "30d"
  }'
The response is JSON with a results array. For simple aggregate queries like this one, you get a single object with your metric values.
Breaking Down by Dimension
The real power comes from adding dimensions. Want to see traffic broken down by page, source, or country? Add a dimensions array:
curl -X POST https://plausible.io/api/v2/query \
  -H "Authorization: Bearer YOUR_API_KEY" \
  -H "Content-Type: application/json" \
  -d '{
    "site_id": "yourdomain.com",
    "metrics": ["pageviews", "visitors", "bounce_rate"],
    "date_range": "30d",
    "dimensions": ["visit:source"]
  }'
You can also filter — for example, to get metrics only for traffic originating from a specific UTM campaign, or only for a particular page path. The Plausible Stats API documentation covers the full list of available metrics, dimensions, and filter operators.
Plausible Rate Limits
Plausible allows 600 requests per hour on paid plans. For most reporting pipelines that’s generous — but if you’re running high-frequency polling across many sites, track your usage and add a small delay between requests to stay comfortable under the threshold. A 429 response includes a Retry-After header; respect it with exponential backoff rather than hammering the endpoint.
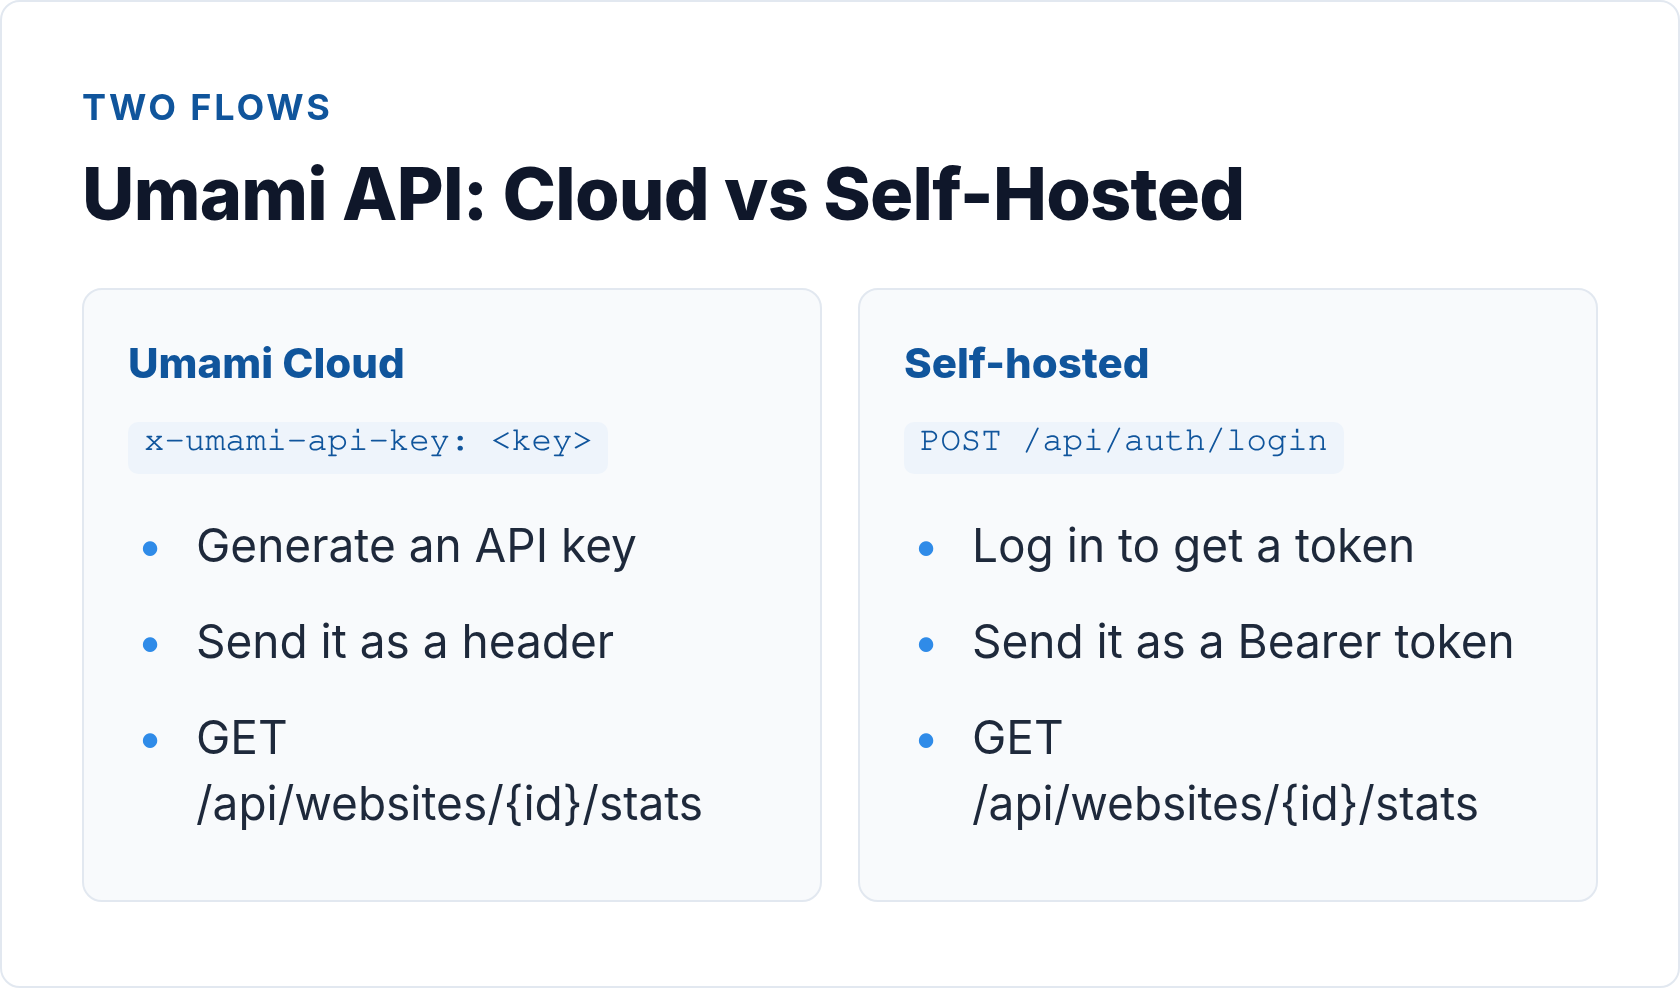
Umami API: Cloud and Self-Hosted Authentication
The Umami API has two distinct authentication patterns depending on whether you’re using Umami Cloud or a self-hosted instance. The data you get back is the same; the way you prove who you are differs. Understanding which path you’re on before you write a line of code saves a lot of confusion.
Umami Cloud: API Key Header
On Umami Cloud, generate an API key from your account dashboard. Then send it as a custom header — x-umami-api-key — on each request. The base URL for all Cloud endpoints is https://api.umami.is/v1.
Here’s a complete example pulling aggregate stats for a website:
# Get website stats for a 30-day window (timestamps in milliseconds)
curl "https://api.umami.is/v1/websites/YOUR_WEBSITE_ID/stats" \
  -H "x-umami-api-key: YOUR_API_KEY" \
  -G \
  --data-urlencode "startAt=1717200000000" \
  --data-urlencode "endAt=1719791999000"
The startAt and endAt parameters are Unix timestamps in milliseconds. On Linux: date -d "30 days ago" +%s%3N. In JavaScript: Date.now() - 30 * 24 * 60 * 60 * 1000.
Umami Cloud: Key Endpoints
The Umami Cloud API is versioned at /v1. The endpoints you’ll use most often:
GET /websites— list all websites in your account (useful for multi-site automation)GET /websites/{websiteId}— metadata for a single site (name, domain, created date)GET /websites/{websiteId}/stats— aggregate metrics: pageviews, sessions, visitors, bounce rate, visit durationGET /websites/{websiteId}/pageviews— time-series pageview and session countsGET /websites/{websiteId}/metrics— ranked breakdown by dimension (url, referrer, browser, os, country, device)GET /websites/{websiteId}/events— custom event data with propertiesGET /websites/{websiteId}/active— current active visitors (real-time)
Full endpoint reference: Umami API documentation at docs.umami.is.
Self-Hosted Umami: Login → Bearer Flow
Self-hosted Umami uses a login-then-token pattern. First you POST credentials to /api/auth/login to get a session token, then use that token as a standard Bearer on subsequent requests. The base URL is your own instance domain.
# Step 1: Authenticate and capture the token
TOKEN=$(curl -s -X POST https://your-umami.example.com/api/auth/login \
  -H "Content-Type: application/json" \
  -d '{"username": "admin", "password": "YOUR_PASSWORD"}' \
  | jq -r '.token')

# Step 2: Query website stats using Bearer auth
curl "https://your-umami.example.com/api/websites/YOUR_WEBSITE_ID/stats" \
  -H "Authorization: Bearer $TOKEN" \
  -G \
  --data-urlencode "startAt=1717200000000" \
  --data-urlencode "endAt=1719791999000"
The session token expires, so for automated scripts you’ll want to re-authenticate at the start of each run, or cache the token and refresh when you get a 401. Self-hosted endpoint paths mirror the Cloud API — /api/websites/{id}/stats, /api/websites/{id}/metrics, and so on — so scripts are mostly portable between the two deployment modes by swapping the base URL and auth header.
Umami Rate Limits and Practical Considerations
Umami Cloud doesn’t publish hard rate limits in the same way Plausible does, but the same common-sense rules apply: avoid tight polling loops, batch requests where possible, and add jitter if you’re running parallel fetches across many sites. On self-hosted instances, rate limiting is entirely your own server’s capacity — which is both a feature and a responsibility.
One thing to flag for self-hosted setups: use a dedicated API user with read-only permissions rather than your admin account. The login endpoint transmits credentials on each authentication call, so minimizing the blast radius if credentials are exposed is worth the extra setup step.
Plausible vs Umami API: Side-by-Side Comparison
Both tools expose solid REST APIs, but they make different design choices. Here’s how they compare on the dimensions that matter most for integrations:
| Aspect | Plausible | Umami |
|---|---|---|
| Auth method | Bearer token (Authorization: Bearer header) |
Cloud: x-umami-api-key header; Self-hosted: POST login → Bearer token |
| Query style | POST JSON body — metrics, dimensions, filters as structured objects | GET with query params (startAt, endAt, type etc.) |
| Base URL | https://plausible.io/api/v2/query |
Cloud: https://api.umami.is/v1; Self-hosted: your domain + /api |
| Filtering / dimensions | Rich — page, source, country, device, UTM and more via filters array |
Good — url, referrer, browser, OS, country, device via type param |
| Rate limit | 600 req/hr (paid plans) | Not published for Cloud; self-hosted = your own server |
| Free tier | 30-day trial, then paid from $9/mo (hosted); self-hosted free (AGPL) | Cloud free up to 3 websites / 100k events/mo; self-hosted always free (MIT) |
| License | AGPL-3.0 | MIT |
| Real-time data | Current visitors endpoint available | /websites/{id}/active endpoint (active visitors) |
| Multi-site via one key | Yes — specify site_id per request; /api/v2/sites to list |
Yes — GET /websites lists all; site scoped by ID in path |
| Event tracking API | Custom events via event:name dimension in query |
Dedicated /websites/{id}/events endpoint with custom properties |
The biggest practical difference is query style: Plausible’s POST-body approach makes complex queries with multiple filters and dimensions easier to express in a readable way. Umami’s GET-based design is simpler for quick stats pulls and works cleanly from a shell one-liner. The license difference (AGPL vs MIT) matters if you’re embedding either tool inside a proprietary product — MIT imposes fewer distribution restrictions.
When to Use Which
After integrating both across a range of client setups, here’s how I’d frame the decision:
Reach for Plausible when:
- You need rich dimensional breakdowns — traffic by source + page + country in one query
- You’re building a reporting layer that aggregates across multiple sites
- UTM campaign tracking matters and you want direct API access to those dimensions
- You want a managed Cloud option with the fewest operational headaches
Reach for Umami when:
- You’re self-hosting and want MIT-licensed software with no usage or distribution restrictions
- You need custom event tracking with properties and want API access to those events
- Your team already runs a Node.js stack and wants something lightweight that fits naturally
- The free Cloud tier (3 sites, 100k events/mo) covers your initial needs
If you’re building on top of first-party data tracking without cookies, either tool works well — Umami’s event API gives you more direct access to custom event data, while Plausible’s aggregation API is cleaner for traffic summaries.
Building a Small Pipeline: Nightly Stats to Postgres
Let’s put this together in a concrete example. The goal: pull yesterday’s stats from Plausible each night and store them in a local Postgres table for long-term trend analysis.
The Schema
CREATE TABLE daily_stats (
  id         SERIAL PRIMARY KEY,
  site_id    TEXT NOT NULL,
  stat_date  DATE NOT NULL,
  pageviews  INTEGER,
  visitors   INTEGER,
  source     TEXT DEFAULT 'plausible',
  fetched_at TIMESTAMPTZ DEFAULT now(),
  UNIQUE (site_id, stat_date, source)
);
The Fetch Script (Node.js)
// fetch-stats.mjs
import { Client } from 'pg';

const PLAUSIBLE_KEY = process.env.PLAUSIBLE_API_KEY;
const SITE_ID = process.env.SITE_ID; // e.g. "yourdomain.com"

async function fetchYesterday() {
  const yesterday = new Date();
  yesterday.setDate(yesterday.getDate() - 1);
  const dateStr = yesterday.toISOString().split('T')[0]; // "YYYY-MM-DD"

  const res = await fetch('https://plausible.io/api/v2/query', {
    method: 'POST',
    headers: {
      'Authorization': `Bearer ${PLAUSIBLE_KEY}`,
      'Content-Type': 'application/json',
    },
    body: JSON.stringify({
      site_id: SITE_ID,
      metrics: ['pageviews', 'visitors'],
      date_range: [dateStr, dateStr],
    }),
  });

  if (!res.ok) throw new Error(`Plausible API error: ${res.status}`);
  const data = await res.json();
  return { date: dateStr, ...data.results[0] };
}

async function store(stats) {
  const client = new Client({ connectionString: process.env.DATABASE_URL });
  await client.connect();
  await client.query(
    `INSERT INTO daily_stats (site_id, stat_date, pageviews, visitors)
     VALUES ($1, $2, $3, $4)
     ON CONFLICT (site_id, stat_date, source) DO UPDATE
       SET pageviews = EXCLUDED.pageviews,
           visitors  = EXCLUDED.visitors,
           fetched_at = now()`,
    [SITE_ID, stats.date, stats.pageviews, stats.visitors]
  );
  await client.end();
}

fetchYesterday().then(store).catch(console.error);
Drop this in a cron job (0 5 * * * node /opt/scripts/fetch-stats.mjs), and you have a rolling history that no dashboard retention limit can touch. The same pattern works for Umami — swap the fetch call for the Cloud endpoint (https://api.umami.is/v1/websites/{id}/stats) with the x-umami-api-key header, convert your date range to millisecond timestamps, and adjust the response parsing for Umami’s slightly different field names (pageviews.value, uniques.value).
Handling Errors Gracefully
A few things to build in from the start:
- Retry on 429: If you hit Plausible’s rate limit, the response includes a
Retry-Afterheader. Respect it with exponential backoff rather than hammering the endpoint. - Validate the response shape before inserting. A null
pageviewsis fine to store; a missingresultskey means something went wrong upstream. - Log fetched_at so you can tell if yesterday’s run silently failed. A row with data from three days ago is worse than a visible gap.
- For self-hosted Umami, cache your Bearer token and only re-authenticate on a 401, not on every run. Hitting the login endpoint unnecessarily exposes credentials more often than needed.
For teams running more sophisticated setups — server-side tag management, custom event pipelines — the considerations in the server-side tracking setup guide apply here too. The API integration layer and the tracking layer share the same security principle: keep credentials server-side, validate everything, and never expose tokens to the client.
Security Considerations
A few rules that apply regardless of which tool you use:
- Never embed API keys in client-side JavaScript. Your Plausible key or Umami
x-umami-api-keyin a browser bundle means anyone can extract it and query your data — or exhaust your rate limit. Proxy requests through your own backend. - Use environment variables, not config files in version control. A
.envfile accidentally committed is a common credential leak vector. Notify your team with something likeapi_key [at] example.comin placeholder comments, never a real value. - For self-hosted Umami, the login-then-token flow means your admin password is transmitted on each authentication call. Use a dedicated API user with read-only permissions rather than your main admin account.
- Rotate keys periodically — especially when a team member with access leaves. Both Plausible and Umami let you revoke and regenerate keys from the settings panel without downtime.
Because both tools are privacy-first by architecture — no cross-site tracking, no PII in the data model — you’re not creating new compliance risk by querying the API. But treat the API credentials with the same care you’d give any database credential.
Final Thoughts
The thing I appreciate most about both the Plausible and Umami APIs, after working with a lot of analytics integrations over the years, is what’s absent: no OAuth flows to babysit, no sampling disclaimers in the response, no dependency on a third-party identity provider. You generate a key, make a request, get clean data.
That simplicity isn’t accidental — it reflects the same philosophy that makes these tools worth using in the first place. When your analytics don’t collect what they shouldn’t, your API doesn’t expose what it can’t. The privacy-first analytics API story is ultimately just a continuation of the privacy-first tracking story: less surface area, cleaner data, easier to reason about.
Start with one endpoint. Get data into a table. Build from there.
// Alicia Bennett
Lead Web Analyst based in Toronto with 12+ years in digital analytics — privacy-first tracking, open-source tools, and the analytics API layer that sits under every dashboard.
More about the author →